Si habla español u otro idioma, utilice la traducción debajo de la imagen.
THERE IS ONLY ONE CERTAIN BARRIER TO TRUTH;
THE CONVICTION THAT YOU ALREADY HAVE IT.
This article will demonstrate the many uses of Stellarium software . . Enjoy
StellariumStellarium is a free open source planetarium for your computer. It shows a realistic sky in 3D, just like what you see with the naked eye, binoculars or a telescope.
It is being used in planetarium projectors. Just set your coordinates and go.
|
|
Below are two "I just can't wait to get started examples."
1) A practice example for finding the first visible crescent new moon day in your area.
First you must do just a bit of configuring Stellarium.
You may download Stellarium here, ( It is a free, safe, open source program).
Here are a few screenshots of the program
Install the software like any other per your system.
- Lets get started
- Hover over this images
Click to view larger image
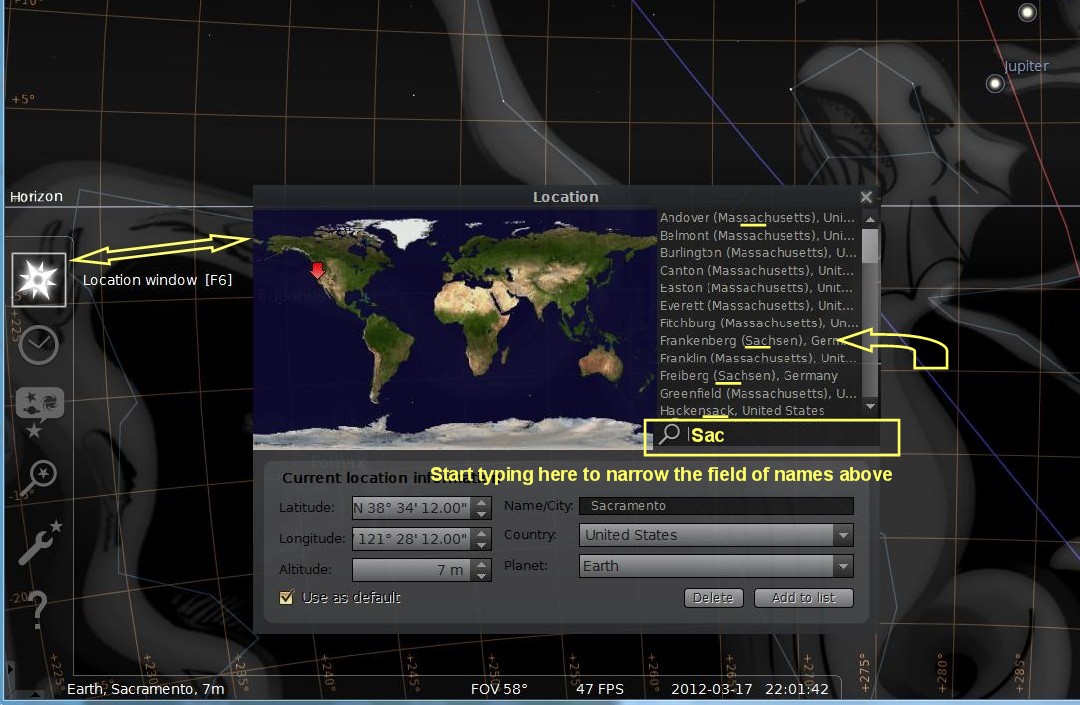 |
Location window
This is an important window and can be a bit tricky, be patient as this is an intricate part of setting up the program.
As soon as you begin to start typing "Sac" in the search box, (yellow box is placed for emphases, you will only see the magnifying glass) this will begin to narrow the field of names above to only those names containing "sac" somewhere within the name.
|
 for more information, click on it for a larger view.
- Let's first set the program to your location.
- Now we will set your date and time. It most likely is already correct
- Let's quickly find the moon here.
I am sure you are already having fun. After you have found the moon
Click to view larger image
 | |
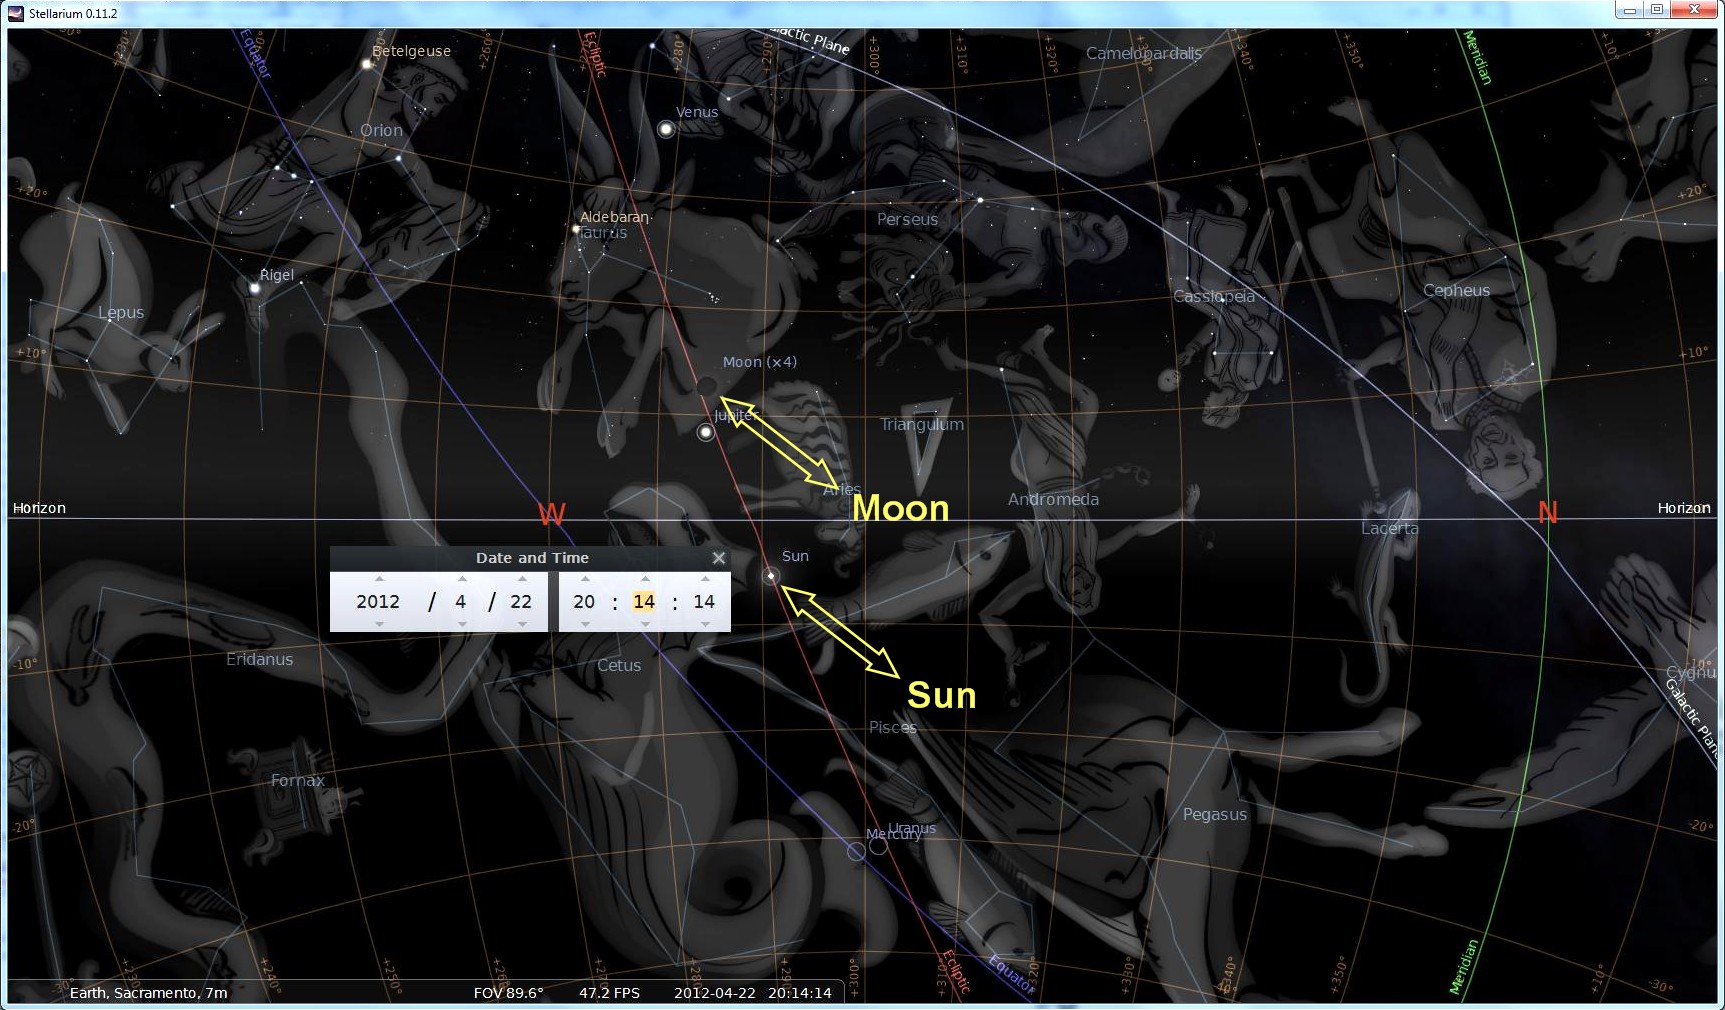
you will want to orientate your horizon to level and be facing west. ) Use your mouse to move the sky to west)
In Stellarium, set the Date to [2012 / 04 / 22] and Time to [20 / 14] like this.

Click to view larger image
 | |
This will position the sun at about 5 degrees below the horizon,
Click to view larger image
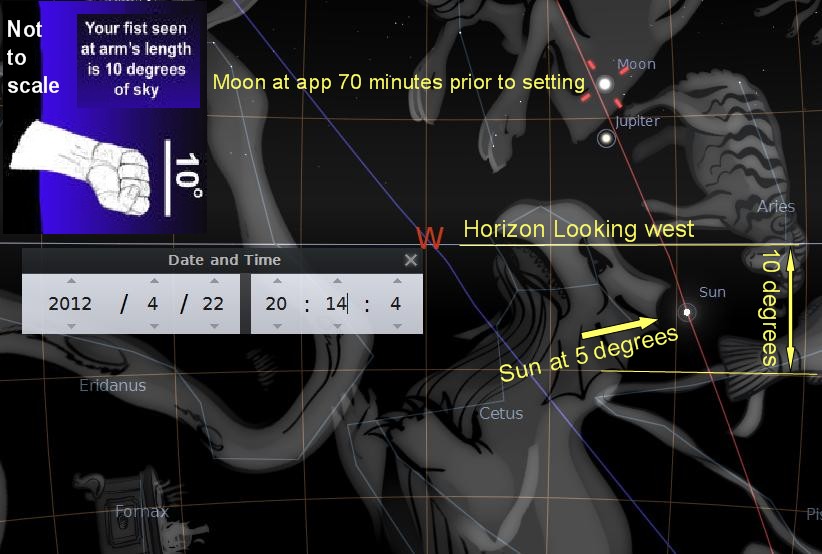 |
A “Handy” Measuring Tool
Learn how to use your hands to measure the size to distance ratio of a familiar astronomical object-- the Moon.
Materials Needed
• your hand • your arm
What To Do:
Using Your "Handy Tool" To Find The moon
(Each persons measurements will differ slightly. You will need to determine the angle and time your fist represents.)
- The width of your fist equals about 10 degrees at an arms length.
- Find the moon.
- Extend your arm straight out in front of you towards the moon.
- Close one eye. Looking at the moon with the base of your fist at the horizon (Vertically orientated). Count the number of your fist vertically it takes to get to the moon. If each fist equals ten degrees, then two fist means the moon is 20 degrees off the horizon. (About 120 minutes before it sets, 60 minutes for each 10 degrees depending on the time of year) Two and one half means 25 degrees off the horizon and so forth.
- Remember, this is not a real accurate way for measuring, but it gives you a quick common method when sharing with a friend.
|
(5 deg = app 27 minutes) and the moon approximately 13 degrees above the horizon, about 71 minutes prior to setting below the horizon. You should see something like this.
Click to view larger image
 | |
(Depending what features you have turned on or off)
Although the amount of time changes for the time of year and the orbit the moon is in, every ten degrees of movement in altitude of the moon, 45 - 50 minutes is a good rule of thumb for every ten degrees.
You have completed your first exercise using Stellarium. Learn more and share with others.
2) A practice example for finding the moon right now.
First you must do just a bit of configuring Stellarium.
- First set the program to your location
- Setting your date and time to now by clicking on

Click to view larger image
 |
Sets time to now
You will find this at the bottom just to the left of center. |
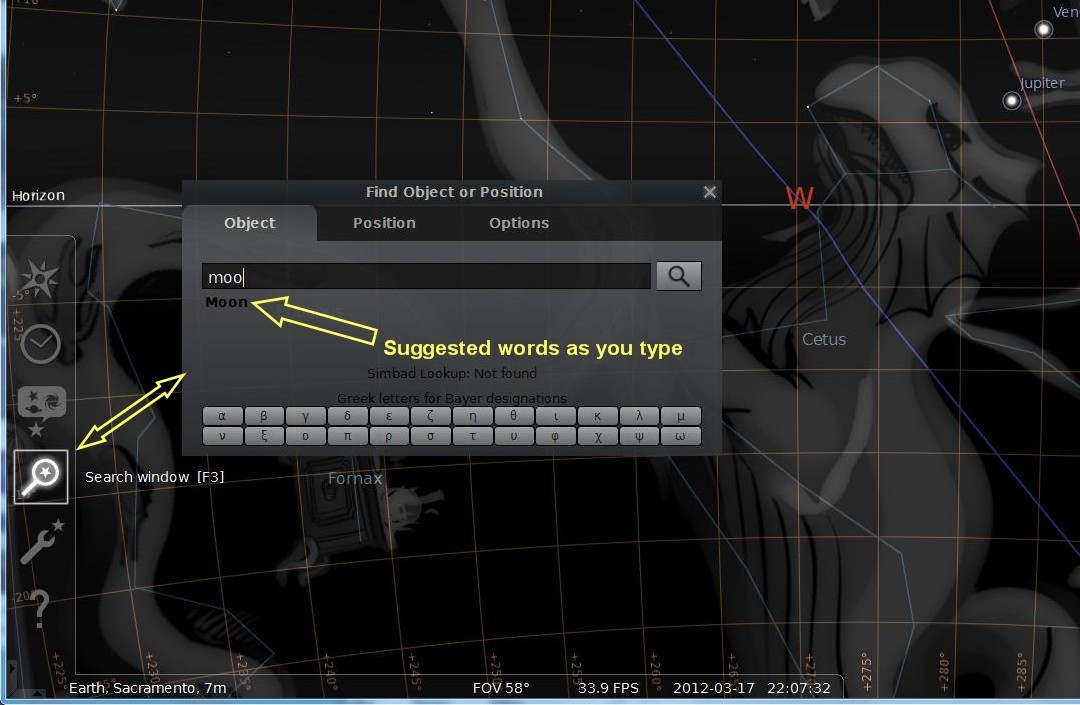
- Now, let's open your "Search Window", hold your "Ctrl" key, simultaneously press your "F" key, or press "F3". This will open this dialog box.
Click to view larger image
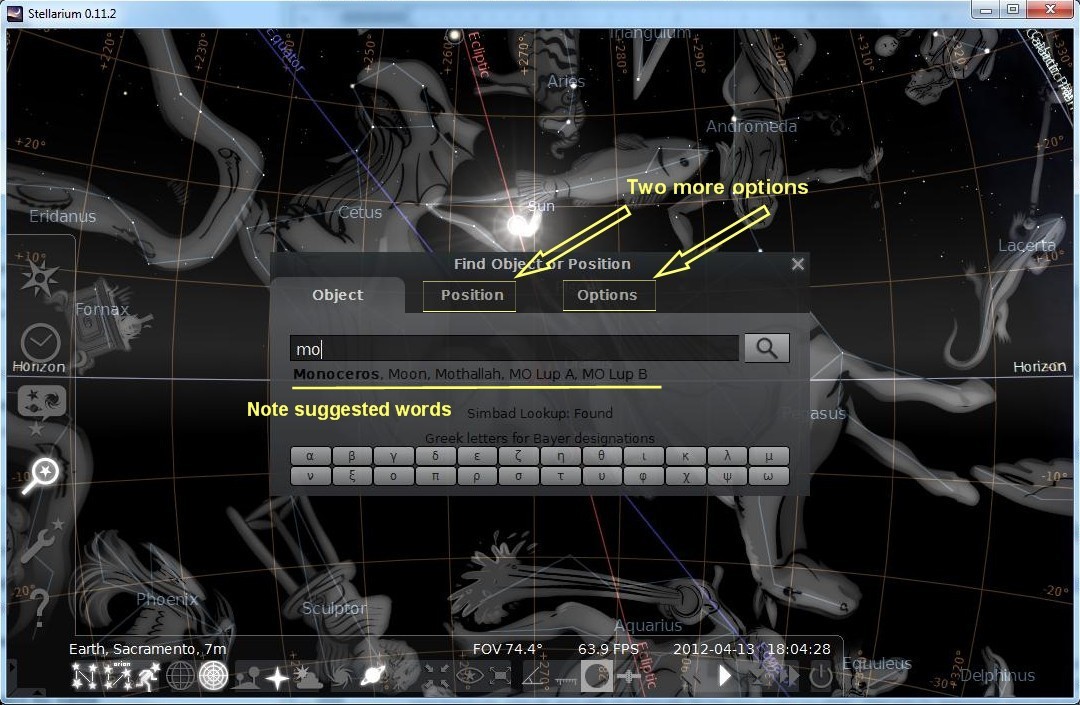 | |
- As soon as you begin to type "moon," suggested words will appear below to assist in future hard to spell words.
- Press enter and this will display in the center of your screen.
Click to view larger image
| | |
You can turn on compass bearings by clicking on.
Click to view larger image
 |
These are the compass bearing marks
|
This way you can take your compass outside to assist you in finding the moon.
If you can think of a way for us to improve on this user guide, please email us. We would love to hear from you.
.
.
.
Uses for Stellarium
Where can I download Stellarium?
Configuring the software
Setting the program to your location
Setting your date and time
Sky and viewing options window
Find/Search Window
Configuration Window
Toggling features on and off
The help menu
FAQ
S
tellarium is a free open source planetarium for your computer. It shows a realistic sky of the stars, moons, constellations and more in 3D, just like what you see with the naked eye, binoculars or a telescope. It is being used in planetarium projectors. Just set your coordinates and go. It also has Screenshot built into the program, discussed later. We personally would like to thank the team at Stellarium for their vision and hard work in putting this wonderful software program together.
.
.
.
Uses of Stellarium
Return to topics
Stellarium is a tool, just as a gardener needs tools to plan and plant the garden, so you will also need to decide 1) why and 2) how you will use Stellarium. This short user guide will assist in showing you how. Why you use Stellarium is limited only to our imagination. It is our prayer it is used to demonstrate the glory of our Creator.
At the Creators Calendar, we believe in providing the necessary tools to each who have come to know the truths of lunar-solar time ordained by our Creator so they might individually and collectively share what each has discovered as . . "The heavens declare the glory of God; and the firmament sheweth his handywork." - Psalms 19:1
- Viewing, calculating for purposes of learning when, where the first visible crescent is best viewed in your area.
- To learn when our Creators years and months begins.
- For Learning and understanding the nineteen year Metonic cycle.
- After discovering wonderful finds of the heavens, share the exciting news with others!
Enjoy learning this program, learning together that we might demonstrate to the world the time system our Creator has placed in the heavens for His people to use. Taking back the knowledge of the "time" Lucifer has taken from our Creator, helping restore His Sabbaths back to Him. Then share with the world what you have learned. If you have any Ideas or thoughts about improving these instructions,
please email us.
.
.
.
Where can I download Stellarium? - Return to topics
Download and install Stellarium onto your computer, then come back and follow this Quickstart guide. - http://www.stellarium.org/
.
.
.
Configuring the software.
Return to topics
Hover over these images
Click to view larger image
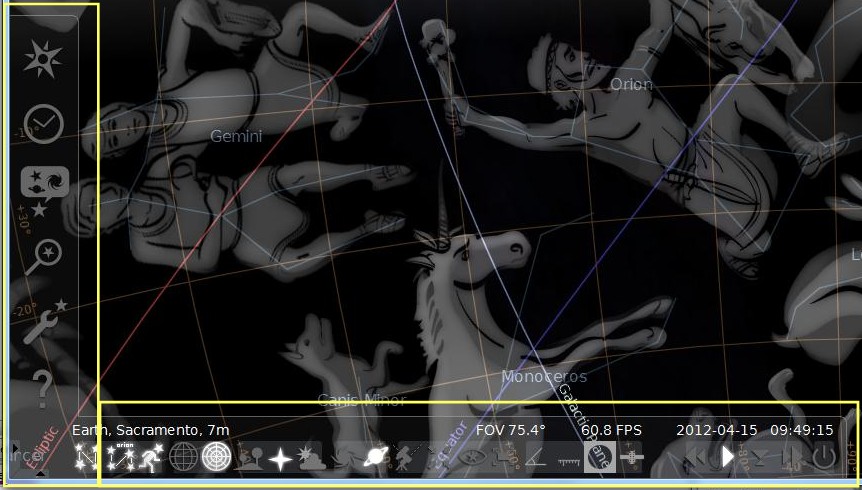 |
Bottom left corner
Here is where you will find all your buttons for configuring Stellarium.
Note: you will need to move your mouse towards the bottom and to the left, or to the left near the bottom. |
for helpful popup images.
Lets get started by moving your mouse to the bottom left corner of your screen until you see both menus open (Hover over this image)
Click to view larger image
| |
Bottom left corner
Here is where you will find all your buttons for configuring Stellarium.
Note: you will need to move your mouse towards the bottom and to the left, or to the left near the bottom. |
These two windows are where all the configuring of Stellarium will be taking place to fit your needs, there is not a lot to do so lets get started.
.
.
.
Setting the program to your location.
Click to view larger image
| |
Location window
This is an important window and can be a bit tricky, be patient as this is an intricate part of setting up the program.
As soon as you begin to start typing "Sac" in the search box, (yellow box is placed for emphases, you will only see the magnifying glass) this will begin to narrow the field of names above to only those names containing "sac" somewhere within the name.
|
Return to top /
Return to topics
The default location is Paris, France (unless someone has re-packaged Stellarium and changed the default).
- Move your mouse to the extreme bottom left corner of Stellarium, click on this icon
 . Find it here . Find it here
Click to view larger image
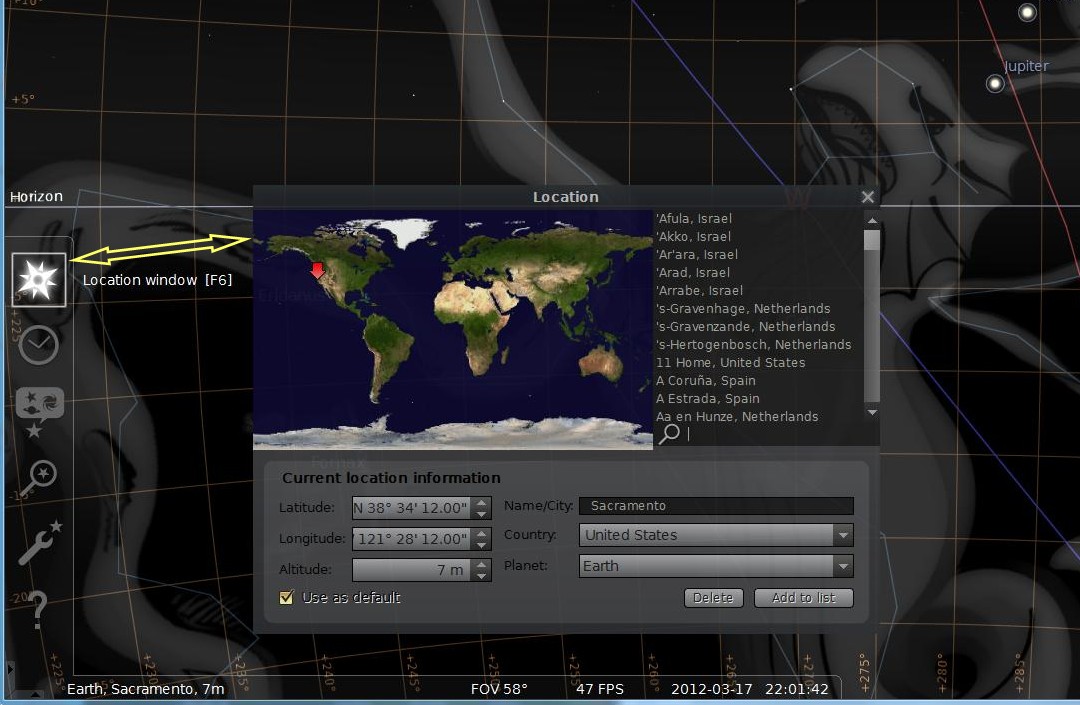 | |
- Select your city from the vertical scroll bar on the right side of this dialog box
- (All cities are listed in alphabetical order among many countries.)
Click to view larger image
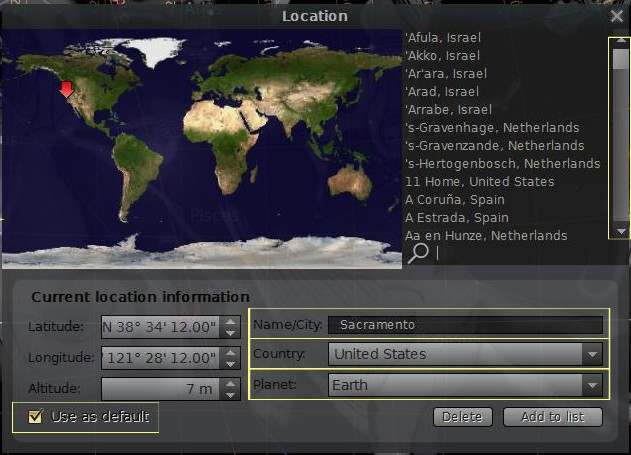 |
Location needs to be filled here
|
- Select your country
- Be sure "Earth" is selected. You can explore other planets later
- Check "Use as default"
If you are not able to find your location in the list, Google the latitude and longitude for your location and enter it here.
Click to view larger image
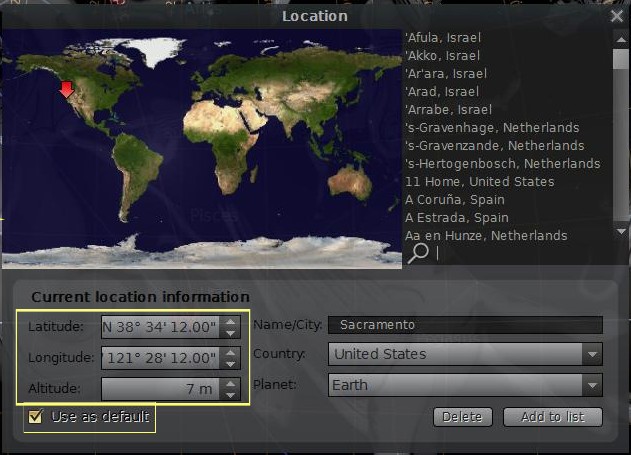 |
Enter your latitude and longitude
If your location is not in the list, enter your latitude and longitude for your location here then fill in the "Name/City" and check "Use as default."
|
You can also select your location by clicking anywhere on the map, by searching for a nearby city.
- Always save your choices here.

Click to view larger image
 |
Save your changes here
As you continue to configure the program more to your likings, be sure to save your changes so the next time you open Stellarium your preferences will come into view. |
.
.
.
Setting your date and time.
Click to view larger image
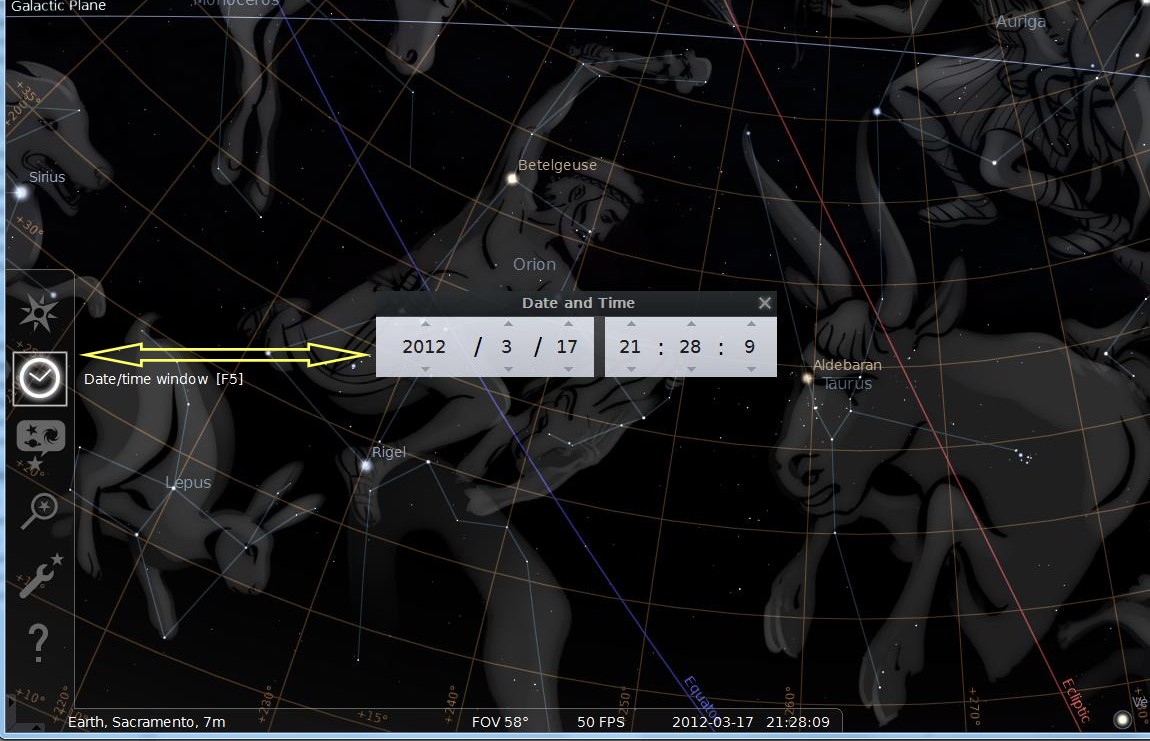 |
Change time and date here
|
Return to top /
Return to topics
This is where the fun begins.
- Each element of date and time of day can be controlled here
Click to view larger image
 |
This is one spot for setting your date and time
By using your mouse on the up/down arrows, time is easly changed. |
Use your mouse on the up/down arrows.
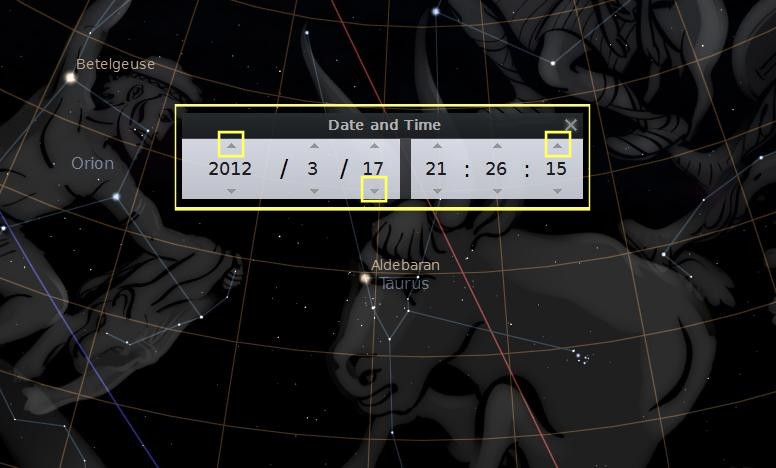
- By hovering over a date or time field
Click to view larger image
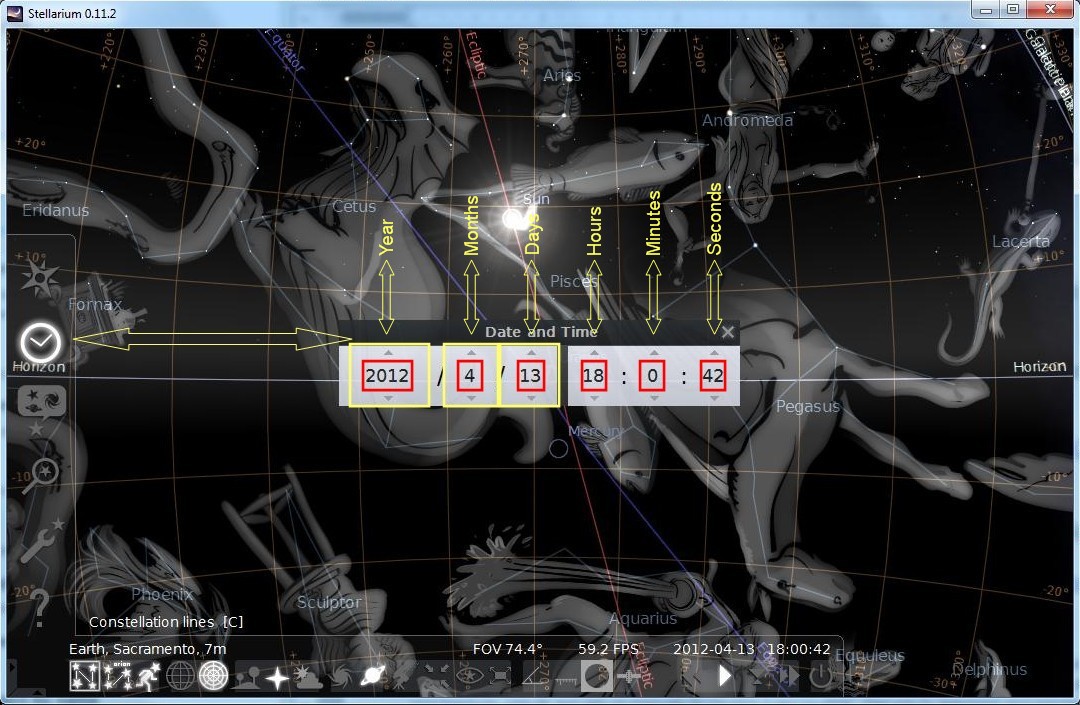 |
Changing the date or time fields
By hovering over a date or time field (Your mouse will need to remain very close to or over the field you are hovering over, inside the red box area) then roll the wheel on your mouse forward, this will advance that field, rolling the mouse back, moves time back.
Try it now, hover over the year field, then roll your mouse forward or backward, notice how the constellations remain in the same location year after year.
Now try the same for the month and day fields . . You may have just learned something, fun right |
(Your mouse will need to remain very close to or over the field you are hovering over, then roll the wheel on your mouse forward, this will advance that field, rolling the mouse back, moves time back.
Try it now, hover over the year field, then roll your mouse forward or backward, notice how the constellations remain in the same location year after year.
- Now lets place the moon in the center of view, (Hold your "Ctrl" key and press "F". When the dialog box opens, type "moon" and hit your enter key. The moon should be centered with 4 red lines.
Click to view larger image
| | |
Now click back into in the month field
Click to view larger image
| |
Changing the date or time fields
By hovering over a date or time field (Your mouse will need to remain very close to or over the field you are hovering over, inside the red box area) then roll the wheel on your mouse forward, this will advance that field, rolling the mouse back, moves time back.
Try it now, hover over the year field, then roll your mouse forward or backward, notice how the constellations remain in the same location year after year.
Now try the same for the month and day fields . . You may have just learned something, fun right |
and scroll your mouse in the manner mentioned above. Note how the moon remains fairly stationary as the constellations move through the heavens (Representing a different month). Does this start to tell you anything about the beginning of each year and month? Each year begins with all the constellations in the exact same location in the heavens. Each month begins with a different constellation in the same general location in the heavens.
Click to view larger image
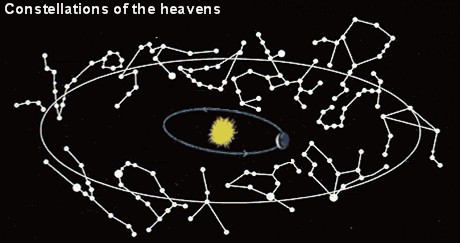 |
Our Creator placed the constellations in the heavens
Still to this day, signs are used as a witness of a special covenant either between Yahuwah and mankind. In Genesis 9:12-13, God put a special sign in the sky.
And God said, "This is the sign of the covenant I am making between me and you and every living creature with you, a covenant for all generations to come: I have set my rainbow in the clouds, and it will be the sign of the covenant between me and the earth."
Observing the correct Sabbath is a sign of a covenant relationship between Yahuwah and those who choose to follow His ways. (Exodus 31:16-17)
Wherefore the children of Israel shall keep the sabbath, to observe the sabbath throughout their generations, for a perpetual (everlasting, unending, eternal) covenant.
The constellations are referred to as signs. (See Gen. 1:14-15) They are somewhat nonrepresentational in form. In other words, they don't look exactly like what they represent. For example, the rainbow after a rain is a sign that God promises to not destroy the world again by water. In like manner, the constellations bring to mind God's wonderful promises concerning the Messiah, His redeeming work, and His promises yet to be fulfilled.
|
Note, the Creators Calendar does not believe in nor do we promote the "Zodiac" in the sense of astrology. However, we do believe in the constellations as they are mentioned in the Bible and our Creator created them for "signs and seasons." Genesis 1:14
- You may also highlight a time element
Click to view larger image
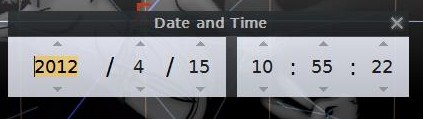 | |
and use your numerical key board to enter values then tabbing to the next field. This works well for moving forward or backwards in time over very large spans.
- Another method of changing time is found here

Click to view larger image
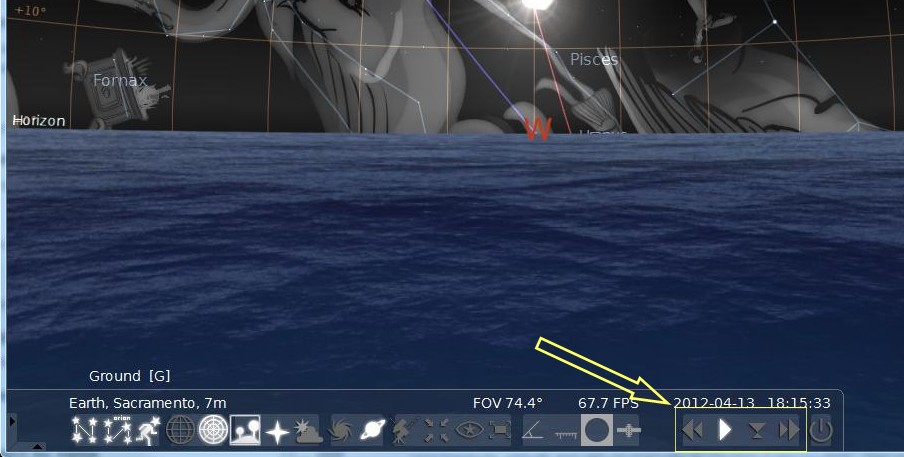 | |
Before we use the motion buttons, this button
 makes time pass as normal or pauses time, remember that, you may need it if things start to spin out of control. Click on this button makes time pass as normal or pauses time, remember that, you may need it if things start to spin out of control. Click on this button
 once and time moves very slow in the corresponding direction. Click on it a second time and the rate of time increases slightly, a third time and faster . . You get the idea. This
returns to the current time & date. once and time moves very slow in the corresponding direction. Click on it a second time and the rate of time increases slightly, a third time and faster . . You get the idea. This
returns to the current time & date.
.
.
.
In the Sky and viewing options dialog window

Click to view larger image
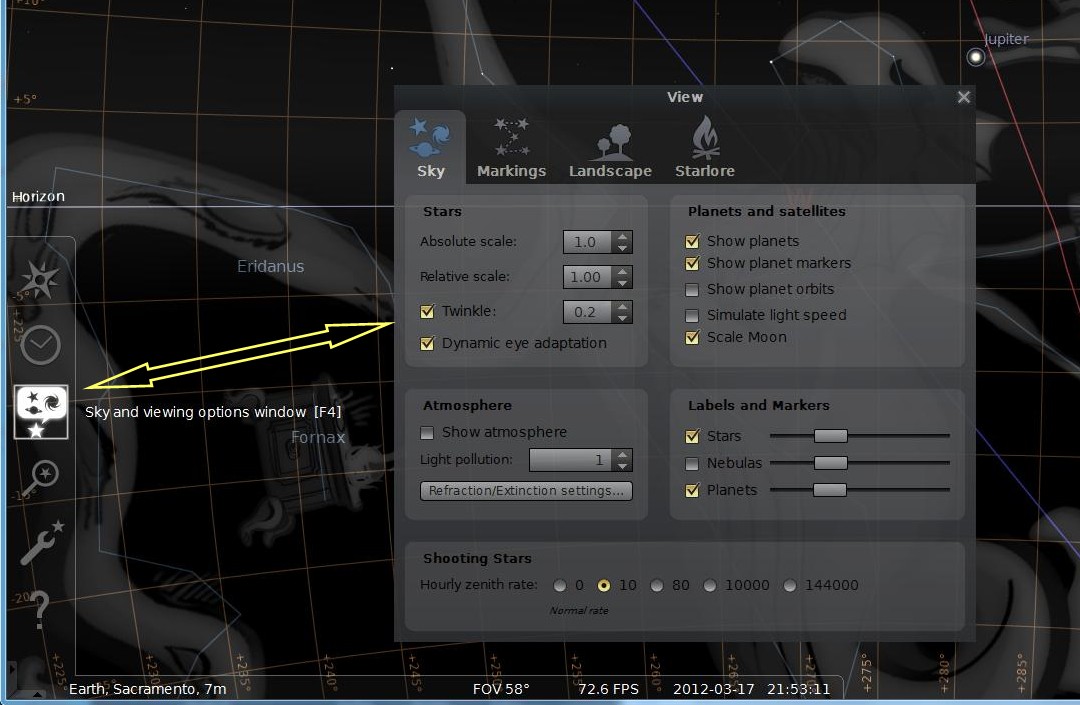 |
Sky and viewing options window
Take advantage of these settings, changing them to fit your preferences . .
The View Settings Window controls many display features of Stellarium which are not available on
the Main Toolbar. You can display the View Settings Window by selecting the icon shown above, or
by hitting F4 on the keyboard. This window has four tabs at the top which will allow you to select
different things for viewing. The diagram above is displaying the Sky Tab.
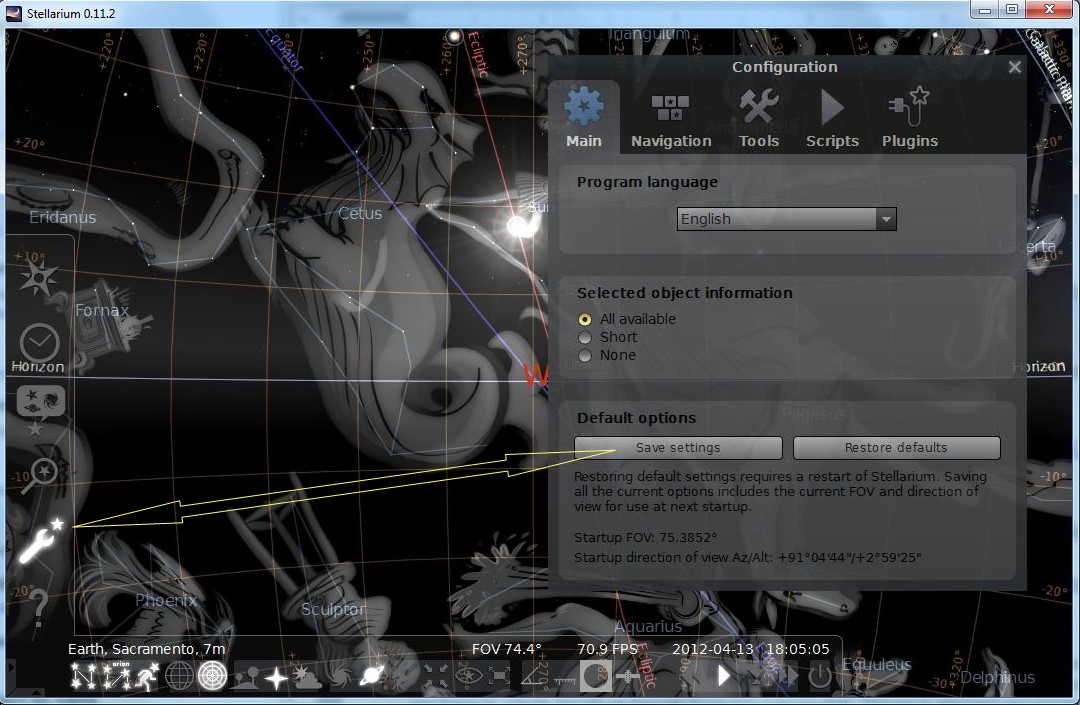
Remember . .
Save your settings when you have the program set the way you like it!
Here - This is found on the left near the bottom, 5th icon down. Click on it, then when the configuration window opens, "Save settings"
|
you will find four tabs.
Return to topics
- Sky
Click to view larger image
 | |
- Absolute scale is the size of stars as rendered by Stellarium. Increasing this value all stars will appear larger than before.
- Relative scale determines the difference in size of bright stars compared to faint stars. Values higher than 1.00 will make the brightest stars appear much larger than they do in the sky. This is useful for creating star charts, or when learning the basic constellations.
- Twinkle controls how much the stars twinkle.
- Dynamic eye adaptation When enabled this feature reduces the brightness of faint objects when a bright object is in the field of view. This simulates how the eye can be dazzled by a bright object such as the moon, making it harder to see faint stars and galaxies.
- Light pollution is common in urban and suburban areas, the sky is brightened by terrestrial light pollution reflected in the atmosphere. Stellarium simulates light pollution and is calibrated to the Bortle Dark Sky Scale where 1 means a good dark sky, and 9 is a very badly light-polluted sky.
- Planets and satellites this group of options lets you turn on and off various features related to the planets. Simulation of light speed will give more precise positions for planetary bodies which move rapidly against background stars (e.g. the moons of Jupiter). The Scale Moon option will increase the apparent size of the moon in the sky 4X, which can be nice for wide field of view shots.
- Labels and markers you can independently change the amount of labels displayed for planets, stars and nebulae. The further to the right the sliders are set, the more labels you will see. Note that more labels will also appear as you zoom in.
- Shooting stars Stellarium has a simple meteor simulation option. This setting controls how many shooting stars will be shown. Note that shooting stars are only visible when the time rate is 1, and might not be visible at some times of day. Meteor showers are not currently simulated.
- Markings
Click to view larger image
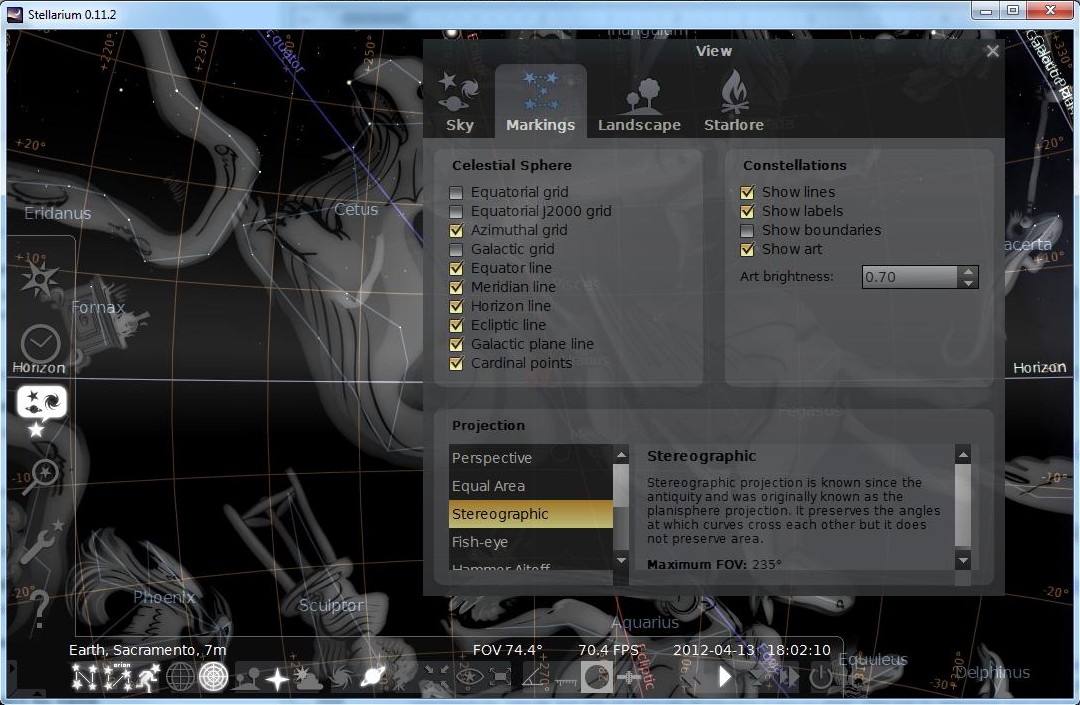 | |
- Celestial sphere - This group of options makes it possible to plot various grids and lines in the main view.
- Constellations - These controls let you turn on and off constellation lines, names, art and boundaries, and control the brightness of the constellation artwork.
- Projection - Selecting items in this list changes the projection method which Stellarium uses to draw the sky. Options are:
- Perspective - Perspective projection keeps the horizon a straight line. The maximum field of view is 150 degrees. The mathematical name for this projection method is gnomonic projection.
- Equal area - The full name of this projection method is, Lambert azimuthal equal area projection. The maximum field of view is 360 degrees.
- Stereographic - This mode is similar to fish-eye projection mode. The maximum field of view in this mode is 235 degrees.
- Fisheye - Stellarium draws the sky using azimuthal equidistant projection. In fisheye projection, straight lines become curves when they appear a large angular distance from the center of the field of view (like the distortions seen with very wide angle camera lenses). This is more pronounced as the user zooms out. The maximum field of view in this mode is 180 degrees
- Hammer-Aitoff - The Hammer projection is an equal-areamap projection, described by Ernst Hammer in 1892 and directly inspired by the Aitoff projection. The maximum field of view in this mode is 360 degrees.
- Cylinder - The full name of this projection mode is cylindrical equidistant projection. The maximum field of view in this mode is 233 degrees.
- Mercator - Mercator projection preserves the angles between objects, and the scale around an object the same in all directions. The maximum field of view in this mode is 233 degrees.
- Orthographic - Orthographic projection is related to perspective projection, but the point of perspective is set to an infinite distance. The maximum field of view is 180 degrees.
- Landscape Tab
Click to view larger image
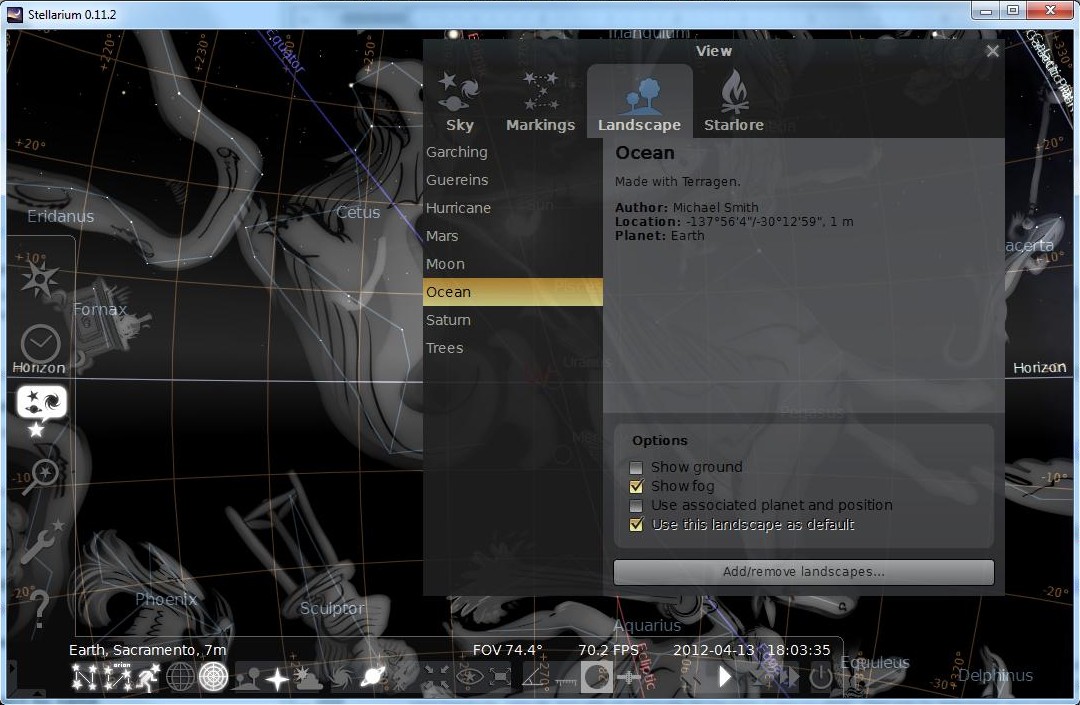 |
Landscape tab
The Landscape Tab of the View Window controls the landscape scenery. To change the
landscape graphics, select a landscape from the list on the left side. A description of the
landscape will be shown on the right.
Note that the landscape can include information about where the landscape graphics were taken (planet, longitude, latitude and altitude), this location does not have to be the same as the location selected in the Location window.
You can set up Stellarium in such a way that selection of a new landscape will alter the location for you.
Stellarium also allows you to take photographs of your local surroundings and use them within the program. Thus, every time you use the program, you will be viewing the horizons that match your favorite viewing spot. This is an advanced option and is not covered in this session.
|
of the View Window controls the landscape graphics (ground). To change the landscape graphics, select a landscape from the list on the left side of the window. A description of the landscape will be shown on the right. Note that while landscape can include information about where the landscape graphics were taken (planet, longitude, latitude and altitude), this location does not have to be the same as the location selected in the Location window, although you can set up Stellarium such that selection of a new landscape will alter the location for you. The controls at the bottom right of the window operate as follows:
- Show ground - This turns on and off landscape rendering (same as the button in the main tool-bar).
- Show fog - This turns on and off rendering of a band of fog/haze along the horizon.
- Use associated planet and position - When enabled, selecting a new landscape will automatically update the observer location.
- Use this landscape as default - Selecting this option will save the landscape into the program configuration file so that the current landscape will be the one used when Stellarium starts.
An advanced topic is Stellarium allows you to take images from your personal sky viewing location so when you use the program, you are viewing your images from your favorite spot.
- Starlore Tab
Click to view larger image
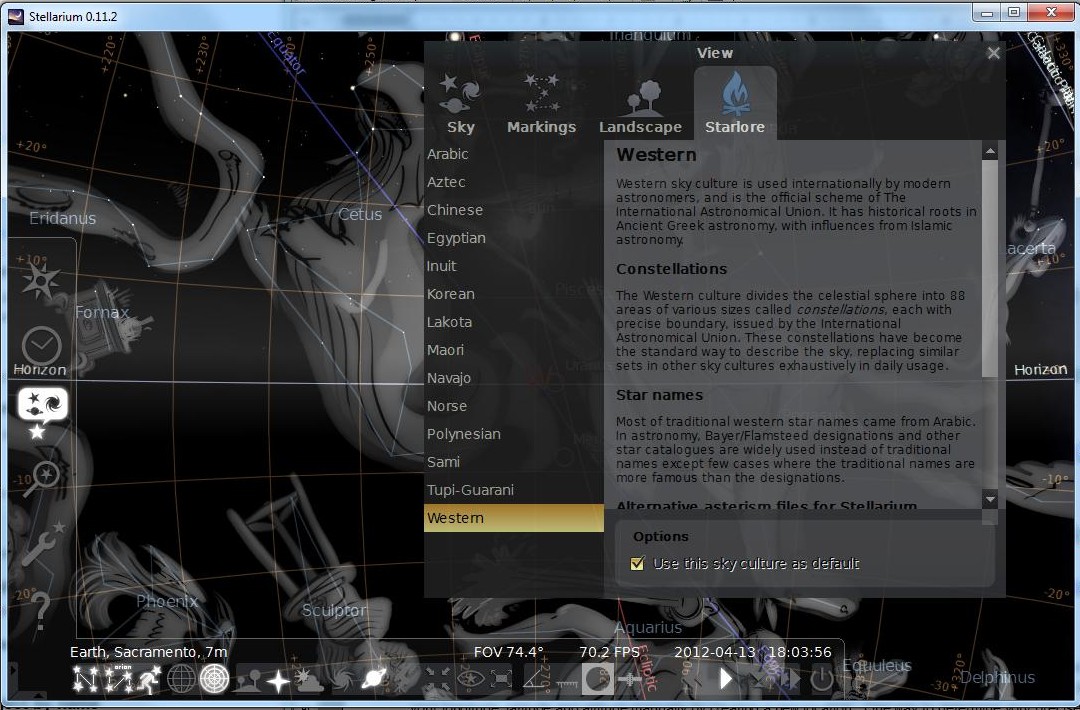 |
Starlore Tab
The Starlore Tab of the View Window controls which culture’s constellations and bright star names
will be used in the main display.
Remember, when you use the Search window to find a constellation, you will need to use the names specific to the Starlore category you are viewing.
For example, while viewing the " Western" Starlore, (default) you will type in "Taurus" (the bull) and find it. But while viewing the Arabic Starlore, you will need to type in "The Bull," as it is specific to the Arabic constellation. Typing "Taurus" while viewing the Arabic constellation will not display results, as "Taurus" is not a part of this Starlore, "The bull" is.
This is another great job of the Stellarium team.
|
of the View Window controls which culture's constellations and bright star names will be used in the main display. When you use the Search window to find a constellation, you will need to use the names specific to the Starlore category you are viewing. For example, while viewing the "Western" Starlore, (default) you will type in "Taurus" (the bull) and find it. But while viewing the Arabic Starlore, you will need to type in "The Bull," as it is specific to the Arabic constellation. This is another great job of the Stellarium team.
On these four tabs you will check or uncheck each of the boxes to suit your desired viewing. As you check and uncheck, watch for slow and subtle changes in the screen as these changes do not take place instantly, but takes over a second. Again remember, Always save your choices here.
Click to view larger image
| |
Save your changes here
As you continue to configure the program more to your likings, be sure to save your changes so the next time you open Stellarium your preferences will come into view. |
.
.
.
Search Window.
Click to view larger image
 |
Search Window
Use this dialog box  to find planets, moons and so forth. |
Return to top /
Return to topics
- Use this dialog box
to find planets, moons and so forth.
Click to view larger image
| |
Searching for the "moon"
Stellarium has done a fine job indexing there choices so as you start to type "moon," suggested words appear under where you are typing to assist in spelling those hard to find items. |
Once you complete your typing and hit enter, your selection will be centered on the screen and look like this
Click to view larger image
| | |
. Stellarium has done a fine job indexing there choices so as you start to type "moon," suggested words appear under where you are typing to assist in spelling those hard to find items.
Remember, if you change your Starlore,
 you will need to search specific to the names in that constellation. For example, the word Taurus is not found in the Arabic Starlore, nor are the words "The Bull" found in the Western Starlore. But "Taurus" is found in the Western Starlore, and the "The Bull" is found in the Arabic Starlore.
- Use the left mouse button to select an object, the right button deselects the object. Middle mouse button or spacebar to center on the selected object. (Clicking your right mouse removes text from the top left of the screen)
Click to view larger image
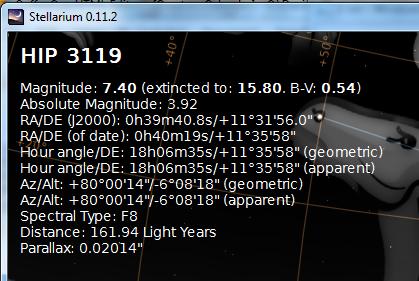 |
Hiding the data
Use the left mouse button to select an object, the right button deselects the object. Middle mouse button or spacebar to center on the selected object.
Clicking your right mouse button anywhere on the screen removes this text from the top left of the screen |
.
.
.
Configuration Window
Click to view larger image
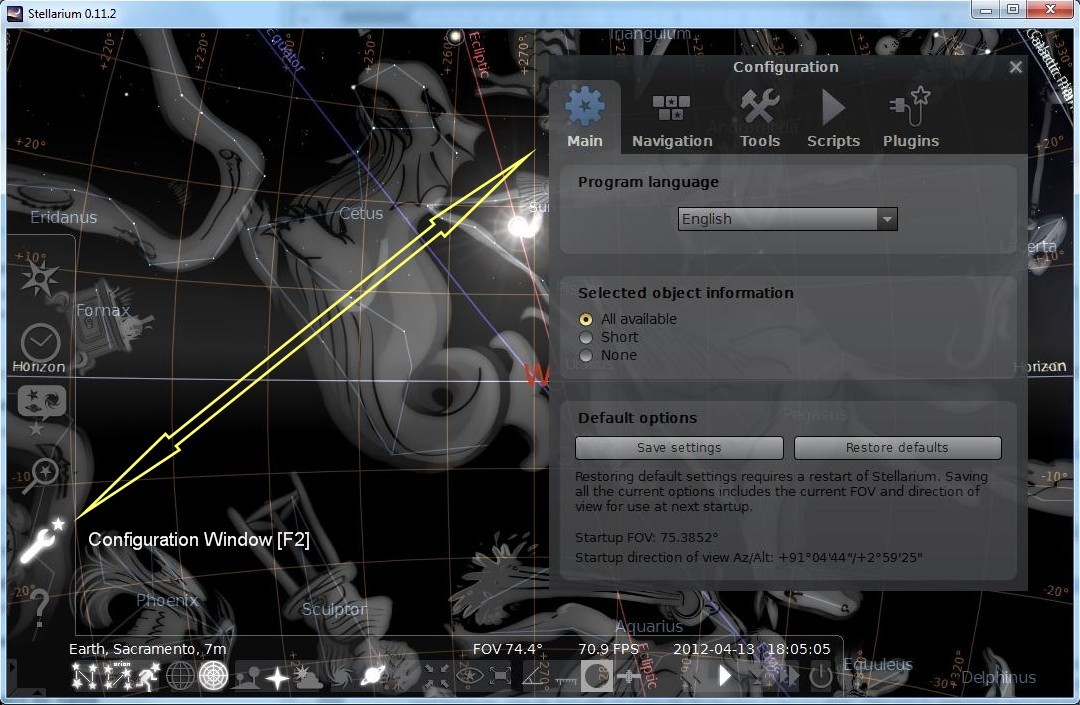 |
Configuration Window
When Stellarium is downloaded onto your computer, it is no longer connected to the internet. When you install Stellarium, you have to configure the program to your location and time in order to see the same sky appear on the screen as is appearing above you at any given time.
Most of Stellarium’s configuration is done using the Configuration Window and the Sky and Viewing Options Window.
To open the Configuration Window, click this button on the left side toolbar, or press F2.
To open the Sky and Viewing Options Window click this button on the left side toolbar, or press F4.
These two buttons are the major part of the configuration process.
• Configuration Window
• Sky and Viewing Options Window
|
Return to topics
This dialog box
has five tabs. Most of these tabs are advanced functions and will not be covered in this short tutorial. Accepting the defaults or replicating what are in the images below works well.
- Program Language
Click to view larger image
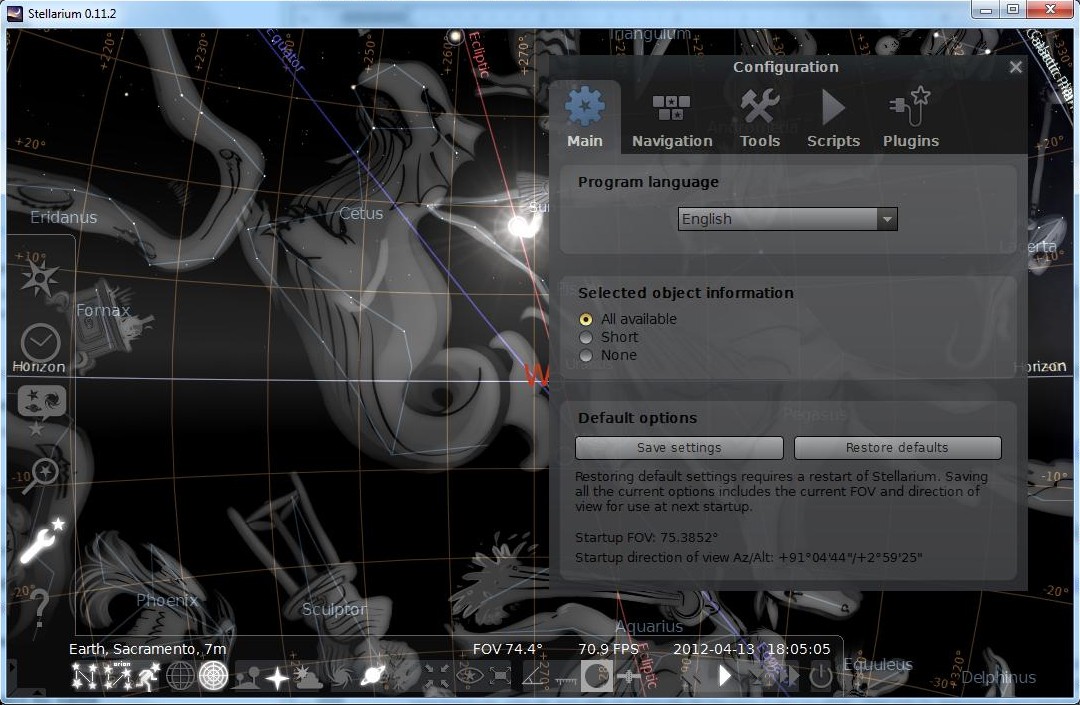 |
Select a Program Language
- Selected Object Information Specify how much information is shown about selected sky objects
- Default Options saves the current program configuration.
Remember to save your settings often.
|
Select the language you would like the program to use.
- Selected Object Information Specify how much information is shown about selected sky objects
- Default Options Save the current program configuration.
- Navigation Tab
Click to view larger image
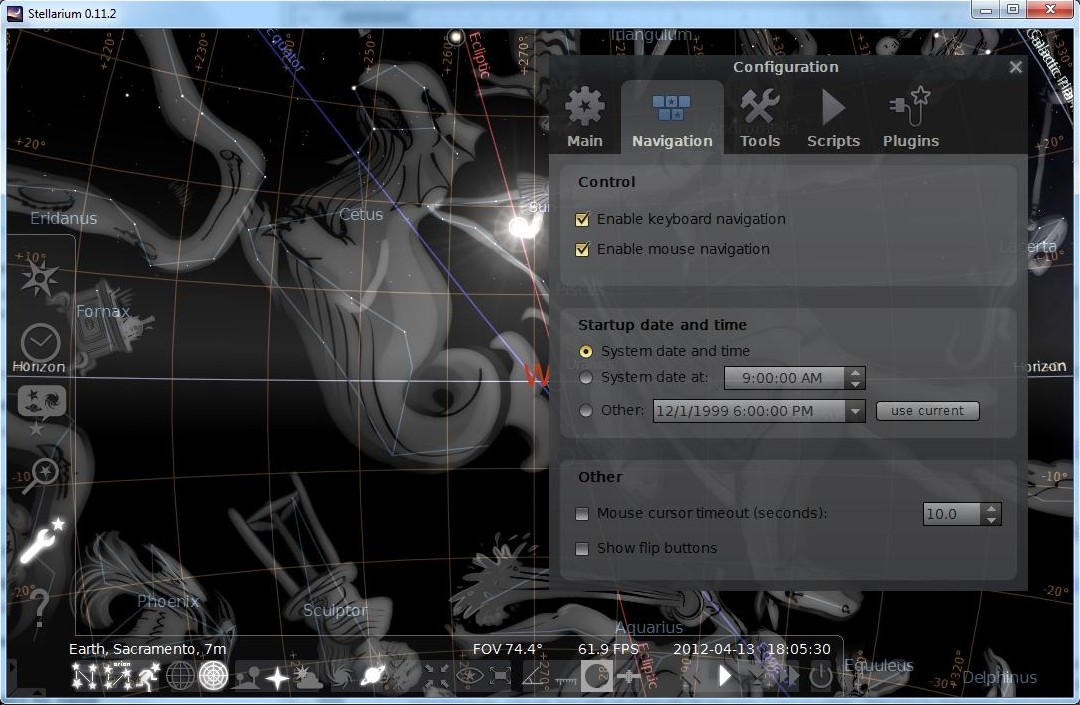 | |
Enable or disable Keyboard shortcuts. For screen movement, this program utilizes your mouse, arrows, function keys or your keyboard. You may use some in combination with each other, or each independently. This page uses your mouse for the following instructions. Function keys are listed below.
- System date and time - Stellarium will start with the simulation time per your computers clock
- System date at - Stellarium will start with the same date as the operating system but selected time
- Other - A fixed time and date can be chosen which will be used every time Stellarium starts
- Show flip buttons - When this radio is enabled, these buttons

 will be added to the Main Toolbar, allowing the main view to be mirrored in the vertically and/or horizontally. Use this when observing through telescopes which may cause the image to be mirrored. (Use caution in using these, you may loose original orientation of the constellations.) will be added to the Main Toolbar, allowing the main view to be mirrored in the vertically and/or horizontally. Use this when observing through telescopes which may cause the image to be mirrored. (Use caution in using these, you may loose original orientation of the constellations.)
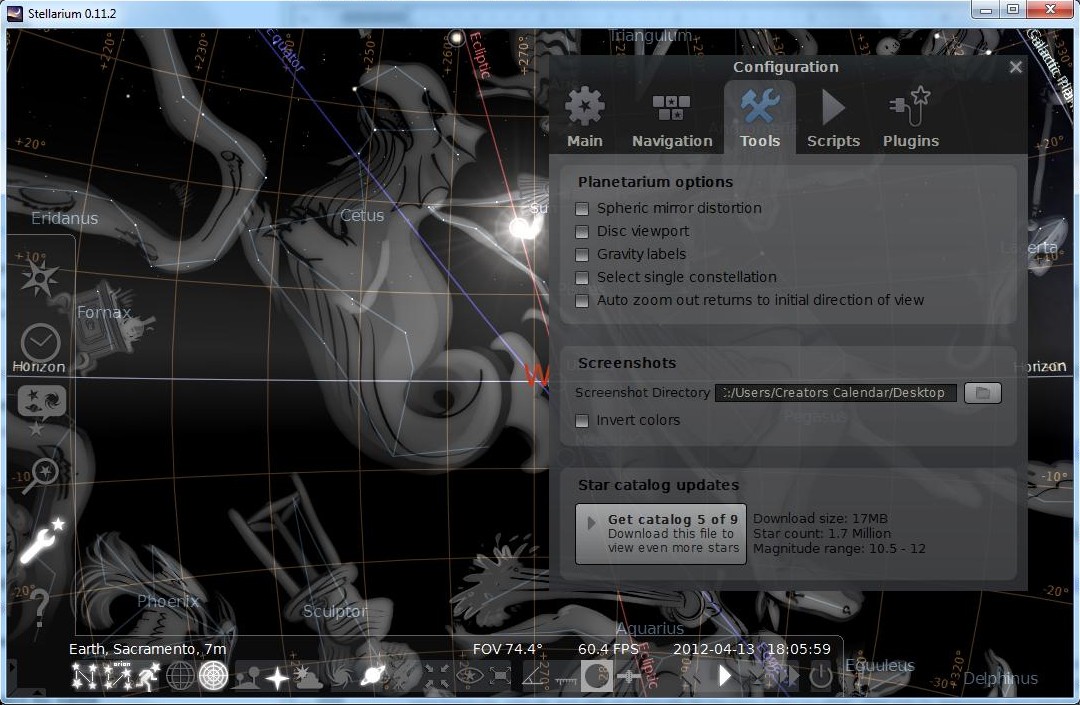
- Tools Tab
of the configuration window contains miscellaneous utility features
- Spheric mirror distortion - This option pre-warps the main view such that it may be projected onto a spherical mirror using a projector. The resulting image will be reflected up from the spherical mirror in such a way that it may be shone onto a small planetarium dome, making an inexpensive planetarium projection system.
- Disc viewport - This option makes the main view produce the effect of a telescope eyepiece. It is useful when projecting Stellarium's output with a fish-eye lens planetarium projector.
- Gravity labels - This option makes labels of objects in the main view align with the nearest horizon. This means that labels projected onto a dome are always aligned properly.
- Select Single Constellation - This option allows you to view one constellation in the sky at a time. Select the box and then click on one of the stars within one of the constellations. All the other constellations will disappear.
- Auto zoom out returns to initial field of view - When enabled, this option changes the behavior of the zoom out key (\) so that it resets the initial direction of view in addition to the field of view.
- Screenshot Directory - This option allows you to select the folder you would like to save your screenshots (bitmap format). Click on the folder beside this option. A window will appear which will allow you to browse through your folders.
- Star Catalog Updates - This option allows you to download more stars into the Stellarium database.
- Scripts Tab
Click to view larger image
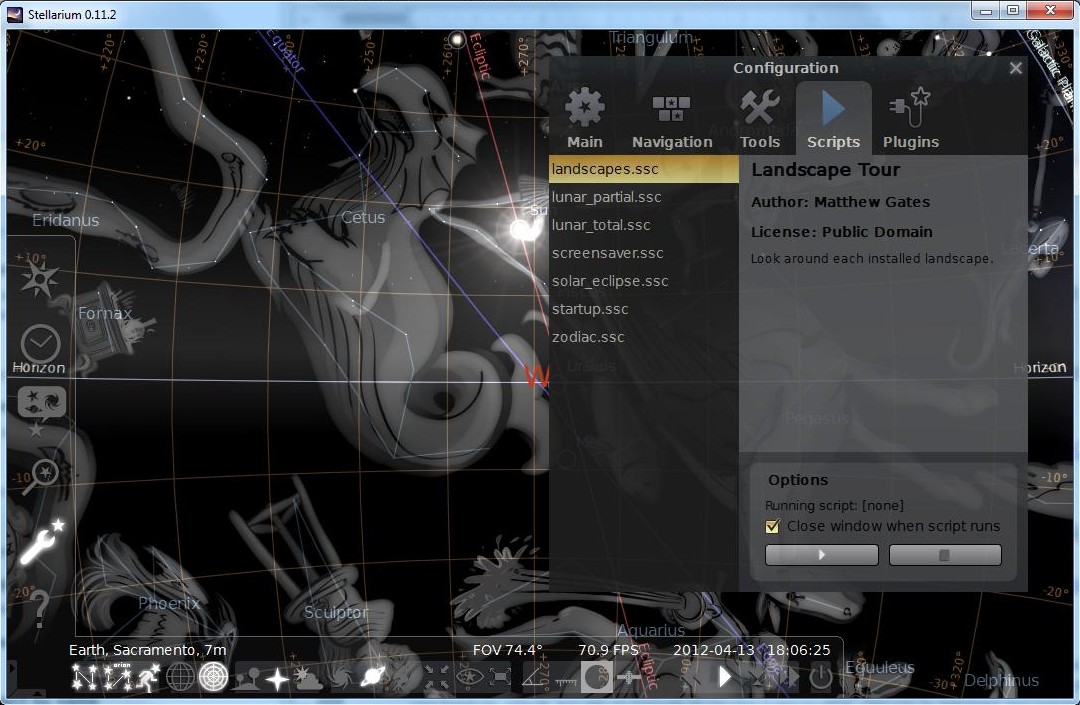 |
Scripts Tab
Scripts Tab has several short video demonstrations about different phenomena that happens in the sky.
Browse through and select a script you would like to watch, then press the play button at the bottom of the window. |
has several short video demonstrations about different phenomena that happen in the sky. Browse through and select a script you would like to watch, then press the play button at the bottom of the window.
- Plugins
Click to view larger image
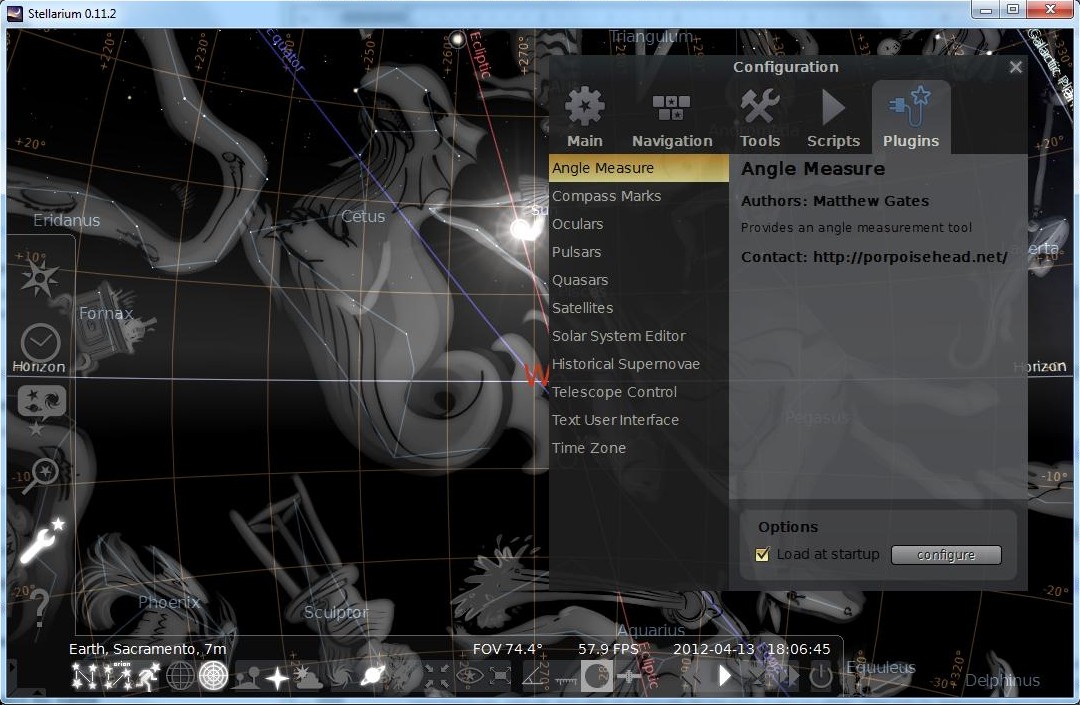 |
Plugins Tab
A problem I had with Stellarium is, the heavens were not showing the moon in the position where I saw it in the sky. I knew I had a problem with the proper time of day being displayed.
If you are seeing a time of day you believe you should not see for the time your computer system clock is set for . .
- click on Time zone at the bottom of the list
- click on Configure
- when the next dialog box opens called Time Zone, be sure "Use system settings (default)" radio button is selected.
Then be sure to save your settings here
|
If you are seeing a time of day you believe you should not see for the time your system clock is set for, click on "Configure," when the next dialog box opens, be sure "Use system settings (default)" radio button is selected.
.
.
.
The help menu.
Click to view larger image
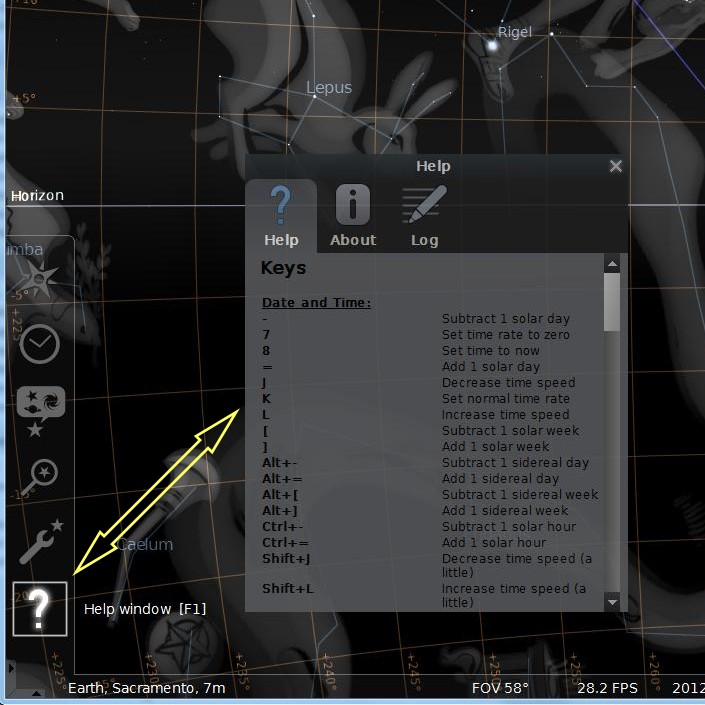 |
Help Menu
Press the F1 key for help.
- Help tab displays shortcut keys
- About tab shows current version
- Log tab tracks system information
|
Return to topics
Press the F1 key for help.
- Help tab displays shortcut keys
- About tab shows current version
- Log tab tracks system information
.
.
.
Toggling features on and off.
Click to view larger image
 |
Toggling features on and off
Move your mouse to the bottom towards the left of the screen, a second tool-bar becomes visible. All the buttons on this bottom tool-bar turn features on or off to further configuration the visual affects of the program. They are all listed below.
Remember, when you have the program the way you like it . . Save your settings here .
|
Return to topics
Move your mouse to the bottom towards the left of the screen, a second tool-bar becomes visible. All the buttons on this bottom tool-bar turn features on or off to further configuration the visual affects of the program. They are all listed below.
Remember, when you have the program the way you like it . . Save your settings here .
Table below describes the operations of buttons on the main tool-bar and the side tool-bar, and gives their keyboard shortcuts.
These can also be found here - http://www.stellarium.org/wiki/index.php/Interface_Guide
| Feature
|
Tool-bar button
|
Key
|
Description
|
| Constellations
|

|
c
|
Draws the constellation lines
|
| Constellation Names
|

|
v
|
Draws the name of the constellations
|
| Constellation Art
|

|
r
|
Superimposes artistic representations of the constellations over the stars
|
| Equatorial Grid
|

|
e
|
Draws grid lines for the RA/Dec coordinate system
|
| Azimuth Grid
|

|
z
|
Draws grid lines for the Alt/Azi coordinate system
|
| Toggle Ground
|

|
g
|
Toggles drawing of the ground. Turn this off to see objects that are below the horizon
|
| Toggle Cardinal Points
|

|
q
|
Toggles marking of the North, South, East and West points on the horizon
|
| Toggle Atmosphere
|

|
a
|
Toggles atmospheric effects. Most notably makes the stars visible in the daytime
|
| Nebulae & Galaxies
|

|
n
|
Toggles marking the positions of Nebulae and Galaxies when the FOV is too wide to see them
|
| Planet Hints
|

|
p
|
Toggles indicators to show the position of planets
|
| Coordinate System
|

|
Enter
|
Toggles between Alt/Azi & RA/Dec coordinate systems
|
| Goto
|

|
Space
|
Centers the view on the selected object
|
| Night Mode
|

|
[none]
|
Toggle “night mode”, which changes the coloring of same display elements to be easier on the dark-adapted eye.
|
| Full Screen Mode
|

|
F11
|
Toggle full screen mode.
|
| Flip image (horizontal)
|
|
CTRL+SHIFT+h
|
Flips the image in the horizontal plane. Note this button is not enable by default. See section [sec:imageflipping]
|
| Flip image (vertical)
|
|
CTRL+SHIFT+v
|
Flips the image in the vertical plane. Note this button is not enable by default. See section [sec:imageflipping]
|
| Quit Stellarium
|

|
CTRL-Q
|
Close Stellarium. Note: the keyboard shortcut is COMMAND-Q on OSX machines
|
| Help Window
|

|
F1
|
Show the help window, which lists key bindings and other useful information
|
| Configuration Window
|
|
F2
|
Show the display of the configuration window
|
| Search Window
|
|
F3 or CTRL+f
|
Show the display of the object search window
|
| View Window
|
|
F4
|
Show the view window
|
| Time Window
|
|
F5
|
Show the display of the help window
|
| Location Window
|
|
F6
|
Show the observer location window (map)
|
.
.
.
FAQ
* Clicking on these topics will take you off site *
This FAQ is a short list of answers to common problems.
Return to topics
This section is directly from Stellarium - http://www.stellarium.org/wiki/index.php/FAQ
It is not supposed to be a substitute for the user's guide that provides much more detailed information about using Stellarium, landscapes, customization, astronomy, etc. This page will only list the bare minimum to get you up and running.
If you have any other questions about Stellarium, you can:
- look at the list of frequently asked questions in Stellarium's support system;
- ask a question in Stellarium's support system (requires registration in Launchpad);
- ask a question in Stellarium's Feedback forum (existing registrations from other sites, including Google and Yahoo, can be used).
|
Contents
* Clicking on these topics will take you off site *
|
General questions
What is Stellarium?
Stellarium is an open source desktop planetarium for Linux/Unix, Windows and MacOSX. It renders the skies in realtime using OpenGL, which means the skies will look exactly like what you see with your eyes, binoculars, or a small telescope. Stellarium is very simple to use, which is one of its biggest advantages: it can easily be used by beginners.
The Stellarium project was started by Fabien Chéreau during the summer of 2001 and uses Sourceforge intensively. Access the Sourceforge project page here.
Is Stellarium free?
Yes! This is the best part, Stellarium is open source software. Anyone has the right to download and use the software for free, to distribute it without modifying to other people, or modify the source code, all of this under the terms of the GNU General Public License (GPL).
Where can I download Stellarium?
Via the download page. Stellarium is hosted on Sourceforge servers. After clicking on the right link of the download page, you will be taken to a list of Sourceforge servers, each with their location. Click on the file icon of the one geographically closest to you, it ensures a speedy download.
Where can I provide feedback?
Your ideas and comments are invaluable to Stellarium. Have a look at the homepage to see where you can get personal support, ask for new features, report bugs and even submit your own patches.
Installing Stellarium
What are Stellarium's system requirements?
Some or all of the information in this section is no longer accurate. It may be relevant to an older version of Stellarium.
This warning has been here since 10 October 2010.
A graphics card capable of rendering OpenGL. A Riva TNT2, released in 1999 or 2000, should do. Stellarium is also fairly processor intensive, so you will get higher framerates with faster processors. Any reasonably recent computer should be able to run Stellarium. Furthermore your computer should be running a Linux, Windows or MacOSX operating system.
To give you an idea of what's possible, we've had success with these older computers:
- Pentium III 800Mhz, 128MB RAM, Intel on board graphics (under Windows XP).
- AMD K6 400 Mhz, 256MB RAM, Nvidia Gforce2 AGP, DirectX 9.0 (Windows XP)
- Mac PPC's back to about 667MHz, running at least OSX 10.3.9, any Mac Intel
How do I install Stellarium?
For Windows users, run the downloaded file "setup.exe" and follow the instructions.
For Linux users, the easiest is to find a pre-compiled package for your distribution.
But it is also possible to compile the program yourself: detailed compilation instructions for Linux, Posix, Cygwin and MacOSX are available in the "INSTALL" file. Mac OSX users should download the dmg file, double click on it to open, the application is contained inside, drag the application to your Applications folder.
How do I uninstall Stellarium?
- For Windows users, uninstall Stellarium using the "Add or Remove Programs" applet in the Windows control panel.
- For Linux users, use your package manager if you installed a pre-compiled version.
- If you compiled yourself you can uninstall by typing "make uninstall" in the compilation directory.
- If you compiled yourself, ran make install as root afterwards, and removed the compilation directory
- First redownload (if necessary) and extract the source of the version that is installed
- To see what version you've installed run:
stellarium --version
- Then run:
./configure && sudo make uninstall
Using Stellarium
How do I start using Stellarium?
- Set your location first! The default location is Paris, France. You can click on your location on the map in the configuration window, or enter coordinates manually. Don't forget to save the changes. Do that by clicking "set as default". From now on, the sky will look exactly as it looks where you live when you run Stellarium. If you take Stellarium along on a trip with a laptop, you will need to adjust your location of course.
- Use the mouse or arrow keys to look around.
- Use the page up and page down keys to zoom in and out.
- Use the left mouse button to select an object, the right button to deselect the object and middle mouse button or spacebar to center on the selected object.
- Zooming on nebulas or planets is very interesting...
- J slows down or reverses speed, L increases time speed, and K makes time return to normal speed.
- Press the H key for help.
You are running Stellarium on one of those fancy widescreen laptops, and there is no option specifying your screen resolution in the menu. In that case, just open the config.ini file with a text editor, and find the screen_w and screen_h values. Set the numbers to the desired dimensions, save the file and restart Stellarium: enjoy the view!
Is there a user's guide to Stellarium?
Yes. Find out everything you want to know about Stellarium, and the astronomic principles you see demonstrated in the program. Essential reading. See here for more information
How do I use the Satellites/Ocular/Telescope control plugin?
See the the Plugins page for more information.
Customization
How do I use other constellation art in Stellarium?
Want to use other drawings than the ones included in Stellarium, like your own drawings, or antique drawings from the Uranographia?
You will need to change the constellation textures, and possibly adjust their coordinates in the constellationsart.fab file.
If they're not burdened by restrictive copyrights, you can share the set you made with the rest of the community.
Is it possible to show more stars?
Stellarium uses the Hipparcos catalog, which contains over 120000 stars. It is currently not possible to use other star catalogs. Additional stars allowed in Stellarium may be found at the sourceforge download site:
http://sourceforge.net/project/showfiles.php?group_id=48857&package_id=233730
Is Stellarium available in my language?
Starting from version 0.8.0, Stellarium can be tailored to show your language. Settings are in the preferences window, or in the config.ini file. It is possible that the translation isn't complete yet, so we would be grateful if the talented translators among the Stellarium users would contribute to the translations. Info about the process is on the translation page.
Problems
I can't install Stellarium.
Read the installation instructions contained in the "INSTALL" file, which comes with Stellarium.
Stellarium installs, but does not run.
0.9.0 / OSX If you have upgraded from an older version of Stellarium, and your old config.ini file was set so that Stellarium started in full screen mode, 0.9.0 will fail to start. Just edit your config.ini file and edit the line with the fullscreen setting so the value is false.
For other problems, we can offer some accounts of what people experienced in the past. Maybe a file necessary for Stellarium was corrupted or badly formatted in some way. Try reinstalling, don't forget to backup any Stellarium files you might have customized.
Stellarium reports basic actions on standard output and standard error. This output can be read in the cmd window on Windows, or can be seen by starting Stellarium from a terminal in Linux and OS X. Have a read of this output and see if there is any helpful information. If you can't fix your problem, post a support request, and include this output.
Message on console, "locale::facet::_S_create_c_locale name not valid"
If stellarium does not start, and you see this message on the console:
terminate called after throwing an instance of 'std::runtime_error'
  what():  locale::facet::_S_create_c_locale name not valid
Abort trap
Try setting the LC_ALL environment variable to "C" and re-run.
I experience very slow rendering, very low framerates on my computer.
This happens when hardware rendering is disabled. If you have a 3D video card, make sure that your OpenGL drivers are installed and up to date.
Stellarium crashes after it has been running for a while.
Stellarium is pretty processor intensive. This means things can get quite warm inside your computer. If you experience freezes or computer crashes, you might have a heat problem. If this is the case, other processor intensive tasks such as mp3 encoding should lead to the same problem. In the newest versions, a frame rate limiter is present. That should solve your problem.
Some moons are in another position than they should be.
Currently we have no accurate ephemeris for Charon and no ephemeris for Neptunian satellites at all. The other satellite ephemeris should be correct. When you compare with what you see in your telescope you should enable light travel time compensation in config.ini.
The non-Latin font for my language doesn't show up
Chances are your language is included, but the program doesn't include a font for your language, as we're concerned about download size. Find a font for your language, and tell the program which font to use in the config.ini file. See Display complex characters in Stellarium for more details.
Stellarium runs fullscreen at a refresh rate of 60Hz
This is a bug in Windows XP. There are numerous fixes, and there is a small program available for it here (install at your own risk): RefreshLock.
My local language isn't complete, or some terms are incorrect
Translations in Stellarium are a community effort, so it is possible that a local translator started the project, but never finished it, or didn't find help with some specific words. You can help us! Translation tips are on this page: Translation using gettext
I'm having display problems (e.g. fonts render as dots)
Problems range from missing parts in the Stellarium interface, text display problems (on S3 and ATI Rage graphics cards), to missing stars. They mostly occur on older hardware, or on specific on-board graphics chips (an onboard Geforce 4MX user solved the problem by reverting to the older 5.2.1.6 driver for his model). We advise experimenting with the graphics driver (updating, changing settings, reverting to older versions) if you're comfortable doing this. For users experiencing problems with S3 graphics controllers, update the driver to the S3 Graphics ProSavageDDR driver for Windows XP.
Many GUI enhancement, theme engine and skinning programs for Windows can cause problems with OpenGL applications including Stellarium. Please try disabling these if you have them running: WindowBlinds, WindowFX, ObjectDock, IconPackager and Entbloess (and similar programs).
I can't record scripts (on Windows)
- Note: Since version 0.10.1, Stellarium has a new scripting engine. The text bellow applies to versions prior to that.
Stellarium attempts to save a Stellarium script file (.sts) in your user directory. On international versions of Windows, this doesn't work perfectly yet, as the program is looking for the English "Documents and Settings" folder. Workaround: open the stderr.txt file in the Stellarium directory to see where Stellarium is trying to write, create that folder, and you should be able to record scripts now.
When in full screen mode, I still see some of my desktop (on Windows)
If you run WindowBlinds or another skinning/theme program, try de-activating it, or adding Stellarium to the list of applications which should be excluded.
I can't save screenshots (on Windows Vista)
Vista doesn't allow most user programs to write to the Desktop directory. You can choose another directory to save screenshots to by editing the shortcut in the start menu which is used to start Stellarium, like this:
stellarium.exe --screenshot-dir "C:\Path\To\Dir"
In version 0.10.1, the screenshot save directory can be set via the GUI, in the Tools tab of the Configuration window.
Misc
Can I use Stellarium screenshots in my book/website/calendar etc?
Probably. Please have a read of this thread in the forums which discusses the legal implications of using Stellarium screenshots. If you are embarking on a commercial venture, you should probably talk to a lawyer and/or your publisher about it.
"There is no year 0", or "BC dates are a year out"
Stellarium 0.9.1 and later uses astronomical year numbering.
The conventional BC/AD (or BCE/CE) scheme has no year 0 because at the time of it's creation, Europeans were widely ignorant of the concept of the number zero, thus the year before 1 AD is 1 BC. This makes arithmetic awkward, and for this reason astronomers often use a different scheme, referring to AD dates as a positive integer, and re-designating 1 BC/BCE as the year 0. Thus:
| Gregorian |
Common Era |
Astronomical
|
| 2 AD |
2 CE |
2
|
| 1 AD |
1 CE |
1
|
| 1 BC |
1 BCE |
0
|
| 2 BC |
2 BCE |
-1
|
| 3 BC |
3 BCE |
-2
|
|